Top 10 Secrets of Professional Photography to Become an Expert Photographer
You might be looking for the secrets of professional photography as budding photographers and hobbyists. In fact, there are no secrets in photography, but there are some obvious facts to note and they are too obviously overlooked. We find ourselves surrounded by thousands of people who are shooting amazing stuff because professional camera equipment is so inexpensive these days. But, it can seem impossible to ever get noticed with so many other people playing the field. Also, when comparing yourself to other photographers, you can feel like a daunting and unlikely task. That’s why it’s important to know how to shoot photos as a professional photographer. And those who like to get amazing portrait photography sessions; they must know the secret photography tips.
What are the Top Secrets of Professional Photography?
If you’re working with the paying customers to make your own photography portfolio then you can use these photography tips essentially. Your portrait photography session will be more fruitful when you make use of these photoshoot tips. Although these fundamental aspects are unquestionably extremely useful, that fact is that there is a number of common uniqueness shared along with many proficient photographers. Now, let’s know our well-researched top 10 secrets of professional photography tips.
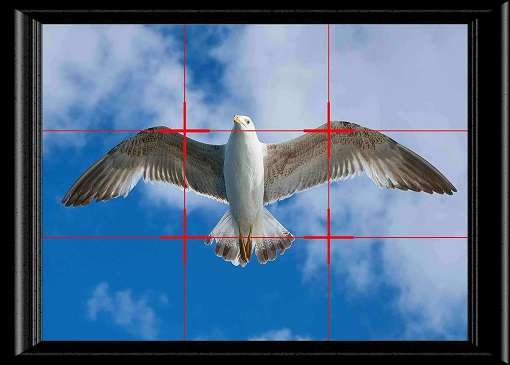
While using one of the most successful rules of composition, this rule helps you take stunning images. And the Rule of Thirds is the composition secret you need to take advantage of if you want to take pictures that have a “wow” factor built in them. So, imagine four lines were two lying horizontally across the image and the other two vertical creating nine even squares to use the rule of thirds. Although some images will look best with the focal point in the center square, it’ll often create a more aesthetically composed photograph by placing the subject off-center at one of the intersecting points of the imaginary lines. Also, the eyes will wander the frame when a photograph is composed using the rule of thirds. It gets more eye-pleasing if a picture composed using this rule for professional photography.
It can plague any photographer and here are some ways to circumvent it as camera shake or blur is something that makes an image less charming. In this case, you have to learn how to hold your camera correctly as it’s the first step. And what you have to do that use both hands were one around the body and another one around the lens. And this way, hold the camera near to your body for support. But, make sure that you are using a shutter speed that is proper for your lens’ focal length for handheld shooting.
Moreover, any unintended movement of the camera will effect in your whole photo shoot coming out blurry if the speed of the shutter is too slow. Here is one rule of thumb and that is your thumb should not shoot at the at a shutter speed if it’s slower than your focal length to minimize this problem. So, this is the rule: 1 / Focal Length (in mm) = Minimum Shutter Speed (in seconds). For example, your shutter speed should be no lower than 1/100th of a second if you’re using a 100mm lens. So, you can avoid this issue by using a tripod or monopod.
You need to master the three basics: Aperture, Shutter Speed, and ISO to get your photos looking their best. Also, you have to know what the relationships between these three controls. You would usually have to consider at least one of the others when you adjust one of them. It’ll provide you with the desired results. But, if you use Auto Mode then it can take care of these controls. That’s why it’s better to know how to use Shutter-priority or Aperture-priority modes. And you also need to know how to ultimately shoot in Manual mode.

Make it a polarizer if you can only buy one filter for your lens. Since these allow your camera to use TTL (through the lens) metering such as auto exposure, the recommended type of polarizer is circular. If you do it, this filter helps to reduce reflections from water as well as metal and glass. In addition, it improves the colors of the foliage and sky by giving your photos the winner factor. This is the fact that it will do while defending your lens. If you do this way then you can leave it on for all of professional photography.

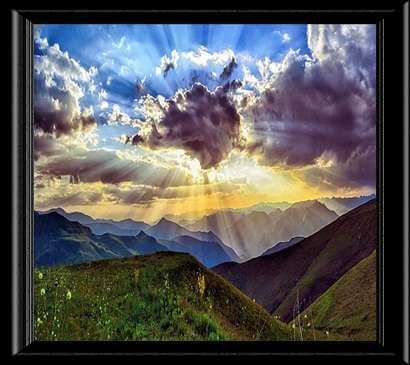
It helps to create a sense of depth, in other words when shooting landscapes. Also, it makes the observer feel like they are there. While keeping the foreground and background sharp, you should use a wide-angle lens for a panoramic view and a small aperture of f/16 or smaller. And it helps give a sense of scale and emphasizes how far away the distance is by placing an object or person in the foreground. As a small aperture usually requires a slower shutter speed, so if possible, use a tripod.
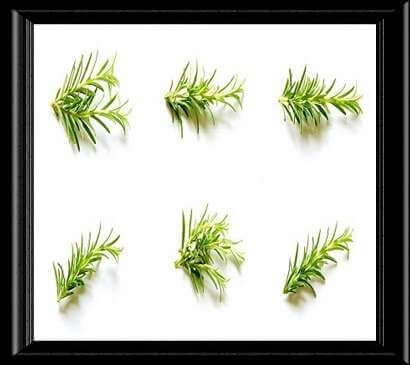
In digital photography, the simple approach is usually the best. And while not including something that is a disruption, you have to choose what needs to be in the shot. So, choose a plain background if possible. On the other words, you can select simple patterns and neutral colors. Instead of a patch of color or an odd building in the background, you want the eye to be drawn to the focal point of the image. It’s very essential when the model is placed off in the middle.
If you use flash, it can look unnatural and harsh. Especially, it happens for indoor portraits. So, you have to use the other way to take an image indoors with no resorting to flash. For example, if you push the ISO up the usually ISO 800 to 1600 will make a big disparity for the shutter speed you can select. And if you use the widest aperture possible then this way lighter will reach the sensor. This way, you’ll have a nice blurred backdrop. You can avoid blur while using a tripod or an I.S. (Image Stabilization) lens. Also, use a flash with a head you can rotate, and point the light to the ceiling on an angle if you absolutely must use flash.
How sensitive your camera is to light and how fine the grain of your image, these are determined by ISO settings. It depends on the situation that the ISO we choose. You can avoid blurring when it’s dark you need to push the ISO up to a higher number, for example, the number may be from 400 – 3200. But, we can select ISO 100 if the days are sunny. Or, you can select the Auto setting when you have more light.
You have to use the panning technique if you want to capture a subject in motion. So, you have to choose a shutter speed around two steps lower than necessary, for example, 1/250 to do this. With your finger half way down on the shutter to lock the focus, keep your camera on the subject. Take the photo when it’s ready. But, keep in mind to follow them when they move. In this case, you have to avoid camera shake by using a tripod or monopod. This will give you clear movement lines in the image for professional photography.
If you want to create some interesting effects, don’t be afraid to play with the shutter speed. Also, use a tripod and try shooting with the shutter speed set at 4 seconds when taking a night time shot. This way, you can see the movement of the object that captures with the trials of some lights. The trails will not be as long or bright; instead, you will freeze the action if you choose a faster shutter speed of say 1/250th of a second. But, you can try to shoot other compositions as moving objects, including waves on a beach, crowds of people walking, cars commuting etc. It’s critical that the camera is stabilized to eliminate camera shake whenever using slow shutter speeds to blur movement.
We have learned about some top secrets of professional photography throughout the content. You should think once again if you’re considering about spending a lot of money on new cameras and lenses. You can shoot amazing photos that will make you proud if you know how to use a modest digital camera. That’s why we tried to find out the above-said secrets by well-judged. We believe that if you follow them, you’ll get good results definitely.
For this time, over to your readers and let us know what you have learned from the above content. If you get some good techniques to flourish your photographic expertise, let it know our audience by commenting below.
Are you need any photo editing service with quality and affordable price, go our services, thanks.

P.O BOX; 10623
SILVER SPRING, MD. 20914
UNITED STATES.
info@clippingusa.com
+1 240 918 9262, +1 (301) 310 6411
HOUSE # 06, ROAD # 02,
SECTOR # 11, UTTARA, DHAKA-1230,
BANGLADESH.
info@clippingusa.com
+1 240 918 9262, +1 (301) 310 6411
12601 SUMMERWOOD DR,
SILVER SPRING, MD, 20904
UNITED STATES.
info@clippingusa.com
+1 240 918 9262, +1 (301) 310 6411