Clipping Mask In Photoshop, Research shows that more than 35% of online buyers want to see a product that features a white background. But for a professional photographer to capture, all images in the white background can be proved a really tough task. It doesn’t really any matter whether you are using photos for print or digital use, the fact that really matters is attention. The key is attention to detail. As technology has grown and people are getting smarter and smarter day by day, now they demand better images. The same formula is applied to your customer also. If you can grab your customer’s attention, then success is just a matter of time.
A clipping mask is an object, like a vector shape or image, that masks (covers up) all other content on the page below it. A popular use of this technique is to cut out an object in one image and paste it over the top of another image. This allows you to create multiple versions of an object without having to manually edit each individual photo.This type of service, which can be found within many different design programs, has become very popular for making quick changes to pictures or creating new ones altogether. From adding a dog’s face onto your family portrait to adding a different background in Photoshop, clipping masks are an easy way to transform an image into something entirely new!Clipping masks are usually created by placing an object on top of another object with transparency turned off. The bottom object will then be masked by the opacity of the top object. Clipping masks can be useful for creating cool looking designs and logos. They’re also great for designers who want to focus on just one particular part of their design, whether that’s a logo or just a certain section of text.
With Clipping mask Photoshop you can attract customers with images. This is really a good technique to apply. Businessmen from all over the world are using this method to expand their business. Are you also thinking to know about Clipping Mask Photoshop? Do you also want to grow your business? Then this is a very useful article for you. Read it carefully and apply this in your professional life. This article will inform you, what is clipping mask is in Photoshop and how to make clipping mask in Photoshop. You will also find out how to use clipping masks in Photoshop. So, let’s start.
Photoshop is one of the most popular tools of graphic designers. It helps them to manipulate the images in the way they want. Photoshop is a very powerful tool that offers more than one way to accomplish the same task. For example, if you want to create a clipping mask then you have more than one way of doing it. An interesting photography effect is in which the object in the photo is in focus while the background is blurred. Celebrating the winners in the wedding photography business is serious. To be honest, it is not easy to get the results you want. You can use many techniques to capture unique or breathtaking images. The main ingredient in wedding photography is the photo editor.
Clipping mask is pretty similar to Photoshop’s layer mask feature. Definition of clipping mask Photoshop can be described like that; the mask that allows you to apply a mask a section cover enables you to apply a veil to numerous layers without a moment’s delay.
As a matter of course, the base layer defines the limits for the general gathering. Contingent upon your base layer’s substance, the above layers will be influenced in certain ways. Underneath, we’ve laid out how to utilize cutting covers effectively in Photoshop, so you can concoct increasingly innovative layering in your photography and configuration work.
Difference between clipping mask Photoshop and layer mask
Maybe you are thinking about what is the difference between a clipping mask and a layer mask? Clipping mask and layer mask both allow you to a fuzzy specific sections of a layer. But Photoshop layer mask needs you to select particularly that section you want to apply mask. If you use paint tools, then you fill in specific areas with black, white, or gray to tell apps what should do. Now a question can come into your mind that, “what is the specialty of clipping mask then? “
In theory, clipping mask uses different layers of contents to indicate what to mask on the layer upper it. It can be more effective, instinctual, and fun to use than layer mask Photoshop. Do you want to know how to make a mask? There are many creative ways to apply it. We will discuss it in the later part. Let’s move forward.
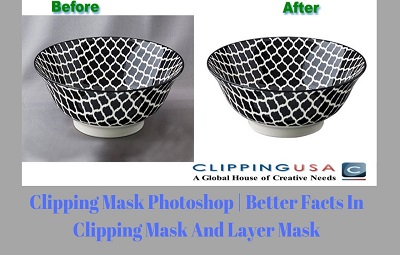
We can see that there are some differences between the clipping mask and layer mask in the picture above. The layer mask is the basic feature in Photoshop. It helps to filter some parts of the layers from the original images. Sometimes it is used for slight additional details. However, it is just an option for a preset setting. A clipping mask is a different option. It only masks the area that is visible with your background. It is a way to achieve a certain effect, some of which is hard to create in a preset setting. How to create a wedding album that will help a couple in the future? The purpose of using the clipping mask as an effect in Photoshop is to achieve an artistic picture. You can transform the background of the images.
Photoshop is an editing tool used by graphic designers and photographers. To be honest, it is one of the most popular software programs in the world. To create clipping mask you must know how to use it. There are many different ways to do this, but I believe that is easiest and quickest. First, take a picture of your object (photographer). In the photoshop you will have to upload it so that it can be in focus. Next, go to Object mode (Control + A or C), Create a new layer from the window that will show. You have to select the clipping mask (Select > New Clipping Mask). Select Object mode again, and continue to use the photo of the object as the source image. It is important to have a well-defined image. To do this, go to Adjustment and Enable Import or Import from Photo Library.
How to make clipping mask in photoshop
In this article, we will be showing you how to create clipping mask in photoshop. There are many different types of clipping masks in photoshop, but we will focus on two of them – just an example. Image mask This mask will allow you to do some special adjustments. First of all, we need to define where the mask will be applied. This will be selected by clicking the Edit button. By doing this, you can see that you can set the mask anywhere. Next, the Edit button will select the colors and size of the mask and finally, you will see a triangle in the lower right corner. This is the logo for your particular device. By doing this, you can choose to control which device is affected by the mask. This is the starting point.
How to clip layers in photoshop
We are all great believers in what the picjumbo is offering and we believe that if you wish to be able to become a great wedding photographer you need a subscription to one of the best services. This service can be offered in the form of a yearly subscription or you can pay on an hourly basis. Photoshop transform Photoshop transform is one of the most popular photo editing tools. It is actually very simple but it has the power to transform an image. For example, if you want to make the sky greener or you want to make it appear red you will have to use a good transform tool. How to create photoshop clip-art If you are a budding artist and you are using photoshop then it will be very interesting to create photoshop clip-art. It is very easy to create a photoshop clip-art from scratch.
How does A Clipping Mask Photoshop works
In Photoshop clipping masks are an effective path to control the visibility of layers. In this case, we compare clipping mask to the layer mask in the previous part. At the end of your work, sometimes the result can be the same or relatively close. Two layers are needed for creating a clipping mask. The layer that is beneath it controls the visibility of the layer above it. In another word, the mask is the bottom layer. The layer above the layer’s cut to the cover.
The layer on the base controls the decidability of the layer above it. At the end of the day, the base layer is the veil, and the layer above the layer’s cut to the cover. That’s why people prefer to use Photoshop clipping Mask Multiple layers.
Where the base layer contains real substance (pixels, shapes, or type), the substance on the layer above it is unmistakable. In any case, in the event that any piece of the layer on the base is straightforward, at that point that equivalent territory on the layer above it will be covered up. That may sound more confounding than how a layer cover functions, yet cutting veils are similarly as simple to utilize. How about we make a cut-out veil ourselves so we can all the more likely see how they work.
The clipping mask software is useful in developing photo edits. Photographers can create interesting photo editing techniques in photoshop. The techniques can help them to make the images better. Read more – 7 Tips to Photograph a Small Apartment By using the clip mask app, you can edit the foreground and the background in the photo. The images in the wedding shots will be blurred which makes it more attractive. So how do you create a clipping mask. 1. Using the Lasso Tool, select the selection area of the photo. 2. With the Smart Object tool or the Crop Tool, place the select area anywhere on your canvas. 3. Click the x sign to crop the selection area. 4. Once you have the selected area selected. Go to the Brush Tool. 5. Select a Text Tool and select the Convert Color.
In this part, you are going to learn step by step how to make Photoshop clipping mask for typography. Let’s dive forward.
At the primary step, you have to create a new document in Photoshop. If you are going to use it for web experts suggest you to set the resolution setting to 72. In the next part type your desired word. Point to be knotted here; you can also use this method for your blog header.
In the next step, you need to create a new layer on top of your text layer You can also create a new layer by going to Layer option then New then again Layer (in the top menu) OR by pressing the icon that looks like of a piece of paper lays after the trash in the bottom right of your layers panel. New layer that you created will be blank. Later on, anything you want can be drawn in this new layer.
In the next step: Make beyond any doubt your new layer is featured on the layers board. At that point, you have to go to Layer then choose Create Clipping Mask. An easy route is to drift between your two layers with your cursor while holding down the alternative key (on a Mac). You’ll see a little bolt spring up and when you click, it will make a cut-out cover.
That’s it. It seems pretty easy for beginners also. But when you are using it for business purposes you need to be very accurate.
Now moves to our today’s main topic;
Photoshop clipping mask tutorial. Scroll down to know its procedure.
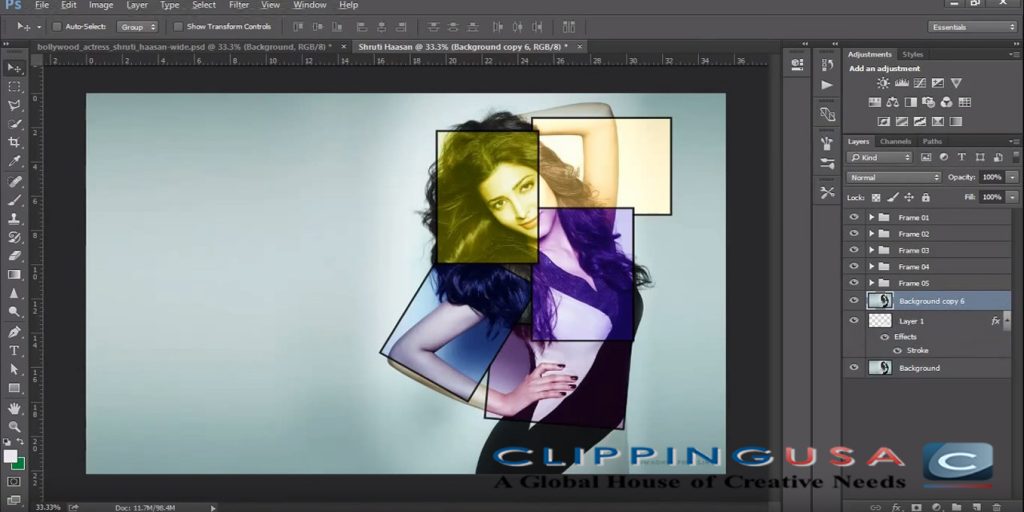
In this section, I am going to show you how to create Clipping Mask in Photoshop. At the very first, you have to go to File. Then choose New and create a new square Photoshop document will be created. Secondly, you need to choose the Rectangle Tool and after this chink and drag at the same time you have to hold the Shift key for creating a square. In the next step just set the fill to black and change the stroke to none.
In this step, you have to press Ctrl + J to make a copy of your black square and then create a 5×5 grid. Don’t forget to assure that the squares are properly spaced. Then go to the View option then choose Snap. Now it will give you more control and flexibility of your square for the placement.
When you’re satisfied with your grid, you need to feature every one of the squares and snap on the New Group symbol at the base of the Layers board to bunch them all together. You can rename this gathering as ‘Squares’.
In this step, open the image that you want to customize in Photoshop, and at the top of the layer drag it into the new document.
While Holding down Alt, click on the jumping line between the Squares gathering and your picture in the layers board. A little bolt ought to show up beside your picture layer, which demonstrates a Clipping Mask has been made.
Finally, you can use the shortcut use Ctrl + T to move and measure your photos as required.
Option of changing the opacity of some of the main squares is also available for a more interesting mosaic effect. You can chink on each specific square in your group. Then change the opacity of the slider as you need.
That was its tutorial part. I hope now you have a proper concept of how to mask in Photoshop. Continue reading to know more details about Clipping masking Photoshop.
Above part was for Photoshop. But if you want to create a clipping mask using Adobe illustrator, then this part is for you buddy. May it sounds complex to you to create a clipping mask in adobe illustrator. But it is not as hard as you think. So let’s forward to its procedure.
At first, choose the desired file and place to place it with the expected one. Then you have to do mask work with objects that are created in illustrator with the object placed there. Then create the item . Create the thing you need to use as a cover by utilizing the Pen instrument to make a shape or a shut way. While making a cut-out veil, ensure that the item to be utilized as a cover is a shut shape and is at the highest point of the stacking request.
In the next step, use the selection tools to select the placed image along with the shape. Then click shift for adding an object to the selection. Later, for creating the clipping mask use keyboard shortcut CTRL + 7 if you are a windows user. Command + 7 is the option for MAC users. That’s it. That was the procedure. I want to let you know one more thing If you want to turn off the clipping mask. Select Object then goes to Clipping mask option followed by Release.
An extra bonus tips for you:
Let’s have a view at the key points of clipping mask Photoshop:
The opaque pixels essentially form a mask for the one or more layers that you clip to it.
When a layer that has other layers clipped to it is disabled/hidden, all clipped layers will automatically hide as well.
Clipping Masks can be created in a variety of ways, with the easiest being to select the layer you want to clip to the layer below, then use the keyboard shortcut Command+Option+G (Ctrl+Alt+G).
The most common use for Clipping Masks is to apply various adjustment layers to a specific layer as opposed to the entire image.
Clipping masks are also very useful for removing fringing in a subject cut-out within a composite image, or to add texture to areas of smoothed skin as demonstrated in the video.
Free clipping mask frames
Many people want to know how they can find free clipping mask templates. Are you one of them? If you are, then this Para is only for you. A few websites provides clipping mask frame. PINTEREST is the best site for this purpose. You can also try PHOTOBUCKET and CREATIVEMARKET.
In the business area, you don’t want to take any kind of risk. That’s why you can take clipping mask online service. Many website provide online clipping mask service. Considering some fact you can take your service for clipping mask. Before placing an order you need to be sure that they are trustworthy, they deliver their order in time and they also charge according to your budget and obviously their service should be quality-full. But before placing an order how can you know about their quality. Then you can try ClippingUSA. Cause, it provides free trial option. You can place a free trial now. CLIPPINGUSA deliver their service in time. On the other hand, it also charges a little. That will obviously meet your budget. So if you want to take online service for clipping mask. Then ClippingUSA deserves thumbs up.

Now allow me to end up with the answers of some frequently asked question.
QU: Why is clipping mask not working?
AN: One needs to use only one path to create a mask. The possible cause can be you are working with multiple paths for creating one mask. Sometimes, a locked layer can be an issue. To customize any specific layer you have to unlock it first by tapping to lock icon.
QU: How to crop a layer in Photoshop?
AN: There is an easy way to apply Photoshop crop layer technique. To perform it you have to utilize rectangular marquee tool to choose which part you are going to crop. After this, remove the complete layers and paste your copied portion into a new layer. This is the similar technique when you are willing to know how to crop one layer in Photoshop. It is an effective technique when you want to crop a bigger canvas.
QU: How to make a box in Photoshop?
AN: To create a box in Photoshop open a new window by pressing CTRL+ N or you can also create on your desired background. Go to shape tool and pick rectangle tool. Then set opacity and foreground color and place it in your working place by dragging the mouse.
QU: How to crop image in Circle shape in Photoshop?
AN: At first open the image that you want to crop. Create a new layer and go to Elliptical Marque option from the topside and create the circle. By holding shift you can move the circle.

P.O BOX; 10623
SILVER SPRING, MD. 20914
UNITED STATES.
info@clippingusa.com
+1 240 918 9262, +1 (301) 310 6411
HOUSE # 06, ROAD # 02,
SECTOR # 11, UTTARA, DHAKA-1230,
BANGLADESH.
info@clippingusa.com
+1 240 918 9262, +1 (301) 310 6411
12601 SUMMERWOOD DR,
SILVER SPRING, MD, 20904
UNITED STATES.
info@clippingusa.com
+1 240 918 9262, +1 (301) 310 6411